To configure the modem you need to connect the modem with LAN cable to your PC/Laptop.Ensure your PC's LAN drivers are properly installed.Next you need to get through the following steps for Internet /WAN set up : -
1.Open your Browser (Internet Explorer, Mozilla Firefox, Chrome, etc.) & delete any default text or url in its address bar & type only the IP : 192.168.1.1 and hit enter. A dialog box similar to the one shown here would pop-up.
Enter Username : admin
Password : admin & Log in.
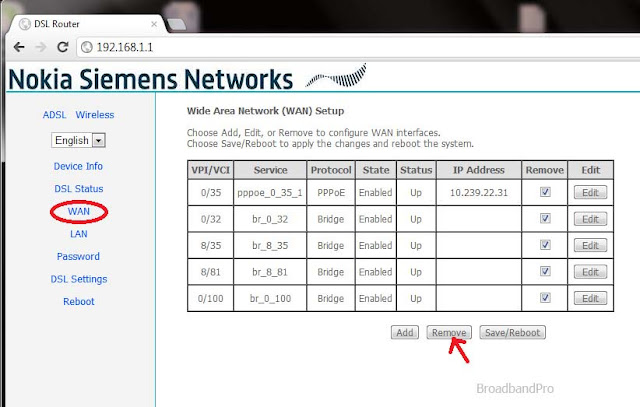
2.After logging in successfully, click on WAN in the left navigation menu.On the right a WAN set up table would show up as shown below.Check all the checkboxes under Remove column & click the Remove button.This will delete all default set-ups.Then click on Add button.

3.On clicking Add button, ATM PVC Configuration page will open where VPI and VCI values are required to be entered.These are ISP specific DSL Broadband PVC settings. (e.g, for BSNL, VPI=0, VCI=35).Click on Next..
4.Select Connection type : PPP over Ethernet (PPPoE)
Encapsulation Mode : LLC/SNAP BRIDGING. Click Next..
5.Enter PPP Username : Your Broadband Username as provided by your ISP.
PPP Password : Your Broadband password as provided by your ISP.
PPPoE Service Name (option field ) : Your ISP name
Authentication Mode : AUTO and click Next ..
6. Now ensure Enable WAN Service is checked. Click Next ..
7.Check whether the WAN set up summary looks as under and click on Save.
8. Then you would be directed to the WAN set up page where you can see the Set up that you have just created. Click on Save/Reboot.The router will then save the current settings & reboot with it and once it is complete you should be able to connect to the internet through LAN.
Wi Fi or Wireless Configuration :
9. To log in to the modem follow step 1 & click on Wireless link in the left navigation menu.Now click on Basic.
Now, check on Enable Wireless
Enter Your Desired Wireless or Wifi Network Name in SSID field and click on Save/Apply.
10. Next click on Security. Select Network Authentication : WPA-PSK
WPA Pre-Shared Key : Your Preferred wifi or wireless network password.
Click on Save/Apply.
11. Next click on MAC Filter. Select MAC Restrict Mode : Disabled
Now click on ADSL in the left navigation menu & follow step 8 to save current configuration & reboot the modem.
Your always-on Broadband Wireless Access Point is now ready !!
If you have any further queries, feel free to post in comments or Contact Us


